You’ve heard the horror stories about MIG welding aluminum without a spool gun—but you’re still thinking of giving it a try.
I get it. Spool guns are expensive and have drawbacks. It’s no secret that aluminum welding is tricky even if you’re using a $250 spool gun.
But if you’re up for the challenge—and have a little patience—I’ll show you techniques and tips to use your welder to MIG weld aluminum without a spool gun.
And you’ll see how one of the most popular 120-volt hobby welding machine does on aluminum straight out of the box—without a spool gun.

A costly accessory
Most of us DIY/hobby welders, sooner or later, need to tackle an aluminum welding project. The first job is usually a minor repair or customization to a vehicle or something around the house.
For a one-time job, you may not want to spend extra money on a spool gun. New spool guns cost half as much as many hobbyists spend on a welder.
And not all MIG welders can support a spool gun—so using one may not even be an option. At least not without buying a new welder. Although, some of the best welders under $500 are spool gun ready.
Successful welding with aluminum requires a stable arc. With its short feed distance, a spool gun provides a steady, reliable feed of the soft aluminum wire. A smooth feed to the weld is key to getting that smooth arc.
As an alternative to a spool gun, it may be possible for you to adjust or adapt your MIG welder so that it can provide a steady, reliable feed of wire to the weld. If you can pull this off—and if your welder has the power needed—there is no reason you can’t weld aluminum without a spool gun.
Just remember, we’re talking MIG, here. You’ll need to use shielding gas with aluminum, so flux cored-only machines are out. And the flux-cored aluminum wire is not available. Even if it were, it would probably be harder to feed than solid aluminum.
Drawbacks to spool guns
Besides the high cost, there are other disadvantages to using a spool gun.
Spool guns are heavy and bulky, so they’re not ideal for the faster travel speed needed for aluminum welding, or use in tight quarters. Also, capacity is limited to small, one-pound spools.
So, if you’re working in close spaces, or on larger projects, you may prefer to use a smaller, lighter MIG torch fed from a larger spool.
As you can see, there are several solid reasons why you would want to try MIG welding aluminum without a spool gun.
Do you have enough welding power?
First, you’ll want to know if your welder has the power needed for the project you’re considering.
Welding aluminum requires more amperage than for the same thickness of steel material. For example, a 140 amp MIG welder is only good up to 10- or 12-gauge aluminum. A 200-amp machine will usually handle up to 3/16” material.

See if your welder includes aluminum settings on a chart or in the owner’s manual. If not, you’ll need to do some research to know what thickness you can work with. You can start with the Miller welding calculator to find aluminum MIG welding settings.
You’ll set your welder’s polarity to DC+. This setting is the same used for MIG welding with solid steel wire. It’s also referred to as reverse polarity, DC Electrode Positive, or DCEP.
Reduce friction to MIG weld aluminum without a spool gun
It’s a delicate balancing act.
You want to reduce the drive roller pressure on the wire to prevent squeezing and deforming the soft wire. The deformed wire will add friction and cause a hang-up.
On the other hand, you need enough roller pressure to maintain a smooth, consistent wire feed to the weld. Any wire slippage will cause the electrode to burn back to your contact tip, ruining it.
Your success depends on how well you can decrease resistance in the wire feed path.
Wire spool
Your choice of aluminum filler wire will affect how well it feeds. Thick is better than thin when choosing wire diameter. Thicker wire is stiffer and will push better. ER4043 and ER5356 are the two most common aluminum MIG wires.
- The ER4043 wire is softer, easier to weld (fluid weld pool), and is suitable for castings. But it turns dark when anodized, and is not for materials with a high magnesium content.
- With its higher tensile strength, ER5356 feeds better. It is also better for anodizing. But don’t use it on castings, or materials subject to service temperatures greater than 150℉.
Do what it takes to get the spool to rotate freely on the hub. You want to make it as easy as possible for the wire drive to pull the wire off the reel without freewheeling and coming unraveled.
You might experiment with loosening, or even removing, tension springs or bushings to reduce drag on the hub.
Wire drive
Welding machines with better wire feed drives have a definite advantage in handling aluminum wire. If your welder has trouble maintaining a smooth arc with steel wire, you’ll have more difficulty with aluminum.
If wire speed varies, so will the heat at the weld. Aluminum will conduct a lot of heat—until it doesn’t. Its melting point is a relatively low 1200℉. Any changes in wire feed speed will cause you to lose penetration one second and burn clear through the next. And you’ll go through a lot of contact tips.
Rollers
The more driven rollers the wire feed assembly has, the better it will handle aluminum wire. Each driven roller can provide more grip with less pressure than undriven guide rollers. Guide-only rollers add resistance to the feed system.
Be sure to clean your wire drive, guides, and rollers before loading aluminum wire. Steel dust picked up by soft aluminum adds resistance. Steel dust carried all the way to the weld will contaminate it.
It’s best to use a clean, smooth roller. Check if aluminum-specific rollers are available for your welder. These have a deep, polished u-groove, giving more grip with less wire distortion. You may even find rollers made from rubber available for your wire drive.
Reduce tension
Keep light tension on your drive rollers.
Use just enough pressure so the drive can move the wire smooth and steady, without slipping. Too much tension will crush the wire and cause drag through the liner.
Your patience will pay off in getting this setting right—it’s a trial and error process. Too much, or too little, drive pressure will cause uneven feeding. You won’t get a stable arc and porosity will be a problem.
If the tension required with a smooth metal roller is deforming the wire, you may want to try a knurled roller. Included with many MIG machines for use with flux-cored wire, a knurled roller can provide more grip on the wire, allowing you to reduce roller pressure and prevent damage.
Of course, the impressions left on the wire may add more resistance than the out-of-round wire. As I said, it’s trial and error.
Buckle under pressure
Incoming wire guides can be a friction point. Some are wide, smooth, and funnel-shaped, and others are very narrow and tight. Many are metal and some plastic. Check that the wire makes a smooth transition into the drive, minimizing bends. Adjust or adapt, if possible.
The outgoing wire guide can contribute to a dreaded “birdnest.”
This happens when the wire drive pushes wire as it should, but meets resistance downstream. If the rollers maintain a grip on the wire, the soft wire can buckle off course to the path of least resistance.
That path is the space between drive rollers and the outgoing wire guide. The larger the gap here, the easier it is for the wire to go astray.
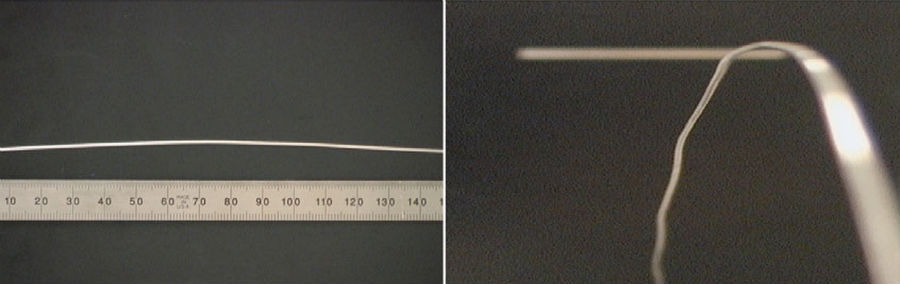
To give you an idea of what you’re up against, a force of under 4 pounds will buckle 0.035” ER4043 aluminum wire. While the same size ER 70S-6 steel wire holds up to more than 21 pounds of force before buckling.
Specialized wire guides are available for some welders. These can reduce friction, and shorten the distance between rollers and guides, both helping to reduce the chance of birdnesting.
Keep the torch cable short
The shorter your cable, the less resistance it adds to the wire-feed path. While 12 feet or less is good, 6 feet is even better. Set up your work area to lessen bends and support the cable. You can also attach a rod as a splint to keep the cable straight.
As a right-handed welder, I weld right to left when pushing the puddle with aluminum.
I set up the welder behind me, just to the right of my right shoulder, and facing the work. With the torch cable straight, supported, and passing by my right hip, I can make 12 to 18-inch weld passes without bending the cable.
Use a non-metallic liner
You can reduce resistance by replacing your steel liner with one made from a non-metallic material.
You can buy the liners separately, or as part of an aluminum feed kit costing $65 to $90. These kits usually include a liner, wire guides, a roller, contact tips, and maybe a small spool of aluminum wire.
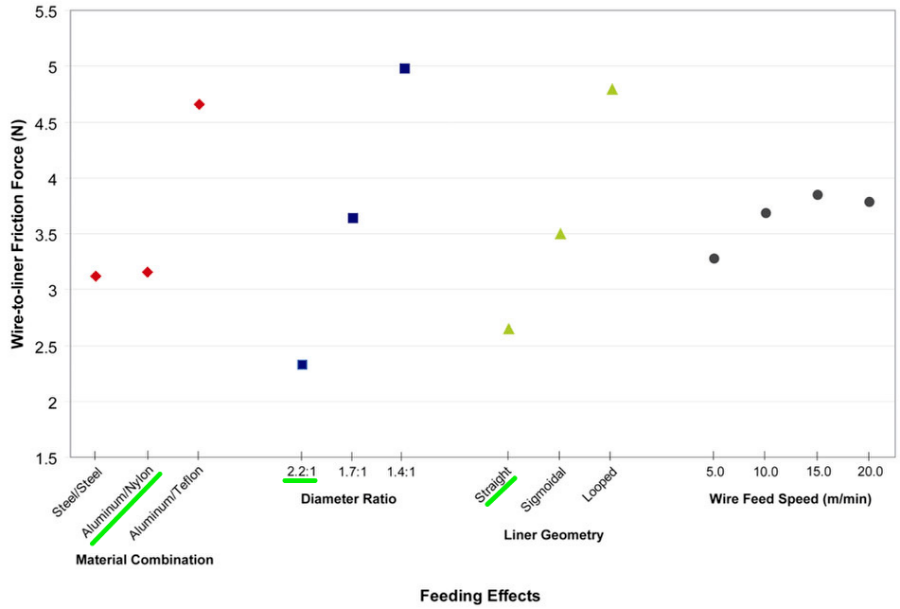
If you refer back to the Feeding Effects chart above, you’ll notice that Nylon® liners reduce friction better than those made of Teflon®.
There’s no harm if you want to try using your steel liner on small jobs, especially with a short torch cable. But the extended use of a steel liner will cause a build-up of shaved aluminum, leading to misfeeds.
Unless it’s new, you should clean the liner to remove all metal dust. Any dust will add friction and contaminate your weld. At a minimum, blow it out with air from the welder end towards the gun. But you may need to remove the liner and clean it with acetone.
Also, be sure to keep your liner clean to prevent a buildup of aluminum oxide from the filler wire. Aluminum oxide is very abrasive and will cause feed problems.
Oversized contact tips handle the heat
Most manufacturers offer contact tips designed for aluminum work. Usually marked with an “A,” they are slightly oversized. This helps to accommodate expansion from heat while maintaining contact with the wire.
You could also try a regular contact tip one size larger than your wire. Burn-back of the feed wire to the tip is a common issue with aluminum welding, so have plenty of contact tips on hand.
Shielding gas a must for aluminum welding
Providing excellent cleaning action, 100% Argon is the most used shielding gas for aluminum work. Avoid C25 or Argon/CO2 blends, as they will oxidize the aluminum.
Don’t overlook material preparation
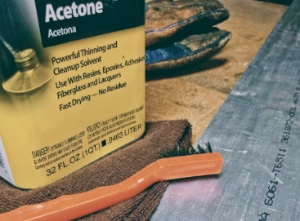
First, clean oil and grease from your workpiece with a non-hydrocarbon-based degreaser. You want to remove impurities before brushing, so they’re not driven into the soft aluminum material. Fast-drying acetone works well for this and leaves no residue.
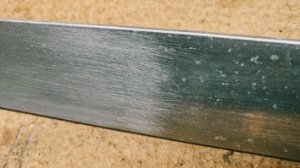
Next, it’s essential to remove the oxide layer from your workpiece.
Having a melting point three times that of aluminum, the thin oxide coating can play havoc with your weld pool. Be sure to use a stainless-steel brush that hasn’t been used on anything but aluminum to prevent contamination of your weld.
Use a light touch, brushing in one direction. You don’t want to force the aluminum oxide into your material. Once you’ve dulled the finish, you’re done.
You could also use a chemical etcher to remove the oxide layer. Helpful for larger workpieces, the etchers are usually strong alkaline or acid solutions.
Give the piece a final wipe down with acetone, and it’s ready to weld.
Tips for MIG welding aluminum without a spool gun
- Try a long stick-out of ¾” to save contact tips. If possible, adjusting the nozzle out 1/4″ helps to maintain gas coverage. Check that tip remains centered in the nozzle or arcing may occur.
- Keep your electrode trimmed. Aluminum wire likes to curl or form a ball at the end.
- Preventing the wire from jabbing into the workpiece before the arc starts will avoid one cause of birdnesting. Wire speeds are fast and a perfect place for a run-in timer to slow the wire until an arc is established. Or, try laying the gun on its side until you’ve established an arc, then rotate into welding position.
- You’ll get better cleaning action and shielding gas coverage if you push the weld puddle.
- If you’re getting a lack of penetration on cold starts, try preheating your work-piece to 200℉.
- Increase travel speed as thin material heats up.
- To prevent burn-through, avoid the weaving motion (curlicues) that you use when welding with steel. Try moving quickly in a straight line, with a brief pause to control temperature, only if needed.
- Backup thin aluminum with clean steel to help regulate material temperature.
- Protect your eyes. Use a darker shade setting (11-12) due to a brighter arc.
- Aluminum doesn’t glow like steel when hot, so be careful what you grab.
- Be sure to test your work. Unlike steel, aluminum alloy welds are usually not as strong as the surrounding material.
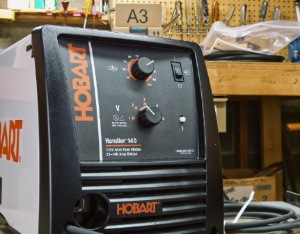
Case Study: Hobart Handler 140 MIG welding aluminum with no spool gun
If you’re an owner of the popular and affordable Hobart Handler 140 MIG welder you might be disappointed to learn your welder is not spool gun capable—and surprised to discover that it can weld aluminum—right out of the box.
Here’s how I used a brand-new Hobart 140 to make solid welds joining ⅛” aluminum flat stock.
About the welder
Reading through the owner’s manual while preparing for a full review, I noticed the Hobart 140 MIG Welder wasn’t compatible with Hobart’s SpoolRunner 100 spool gun. But I saw Hobart’s welding chart included settings to weld 16- and 12-gauge aluminum using 0.030” wire.
Curious about this successful welder’s capabilities on aluminum without a spool gun, I decided to see for myself before running any steel wire through the new liner.
I’ll admit to having some doubts, including:
- A liner made of coiled steel
- The wire drive system is made up of a single set of drive rollers
- A gap between rollers and outgoing wire guide
- Voltage controlled by a 5-position knob
But also optimism:
- While made of steel, the liner was new, clean and only 10 feet long
- Incoming wire guide was of a low friction plastic material
- It appeared easy to eliminate spool hub drag
- The manufacturer provided aluminum welding settings
Materials
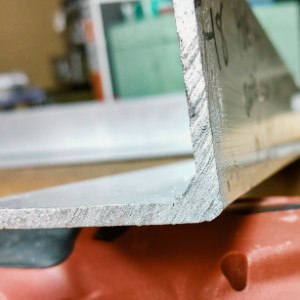
I used several pieces of 2-inch by 36-inch flat bar aluminum in ⅛” thickness. These were wiped with acetone before a light brushing to remove oxidation. Follow this with a final acetone wipe to remove the residue.
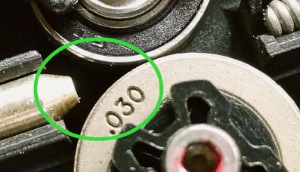
The wire for this test was a new, sealed, one-pound spool of Hobart 0.030” ER4043 aluminum alloy. Part number H381806-R18.
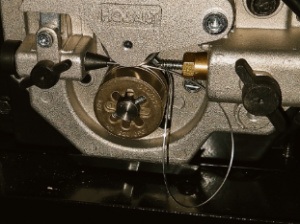
Setup
I experimented with settings before running my demonstration welds. Here are the final settings used for the welds I will show you.
- Spool tension: Eliminated all drag on the spool by backing out the hub nut—it’s not necessary to remove the spring or washer
- Drive roll: Used the smooth .030″/.035″ roller included with the welder
- Wire drive tension set to 1.5
- Wire-speed set at 90 out of 100
- Voltage set at 5 of 5
- Contact tip: 0.035” (also had success using 0.045”)
- Gas: 100% Argon set to 20 c.f.h.
- Nozzle: MIG gas nozzle pulled out about 3/16” to help maintain a ¾” electrode stick-out (be sure it remains centered around contact tip)
Notes:
- Pushed the weld pool in a straight, steady motion (or, tried to)
- Kept the torch cable straight and supported in the middle. The steel liner will grab and hold the aluminum wire if the cable bends. If I left the gun hanging off the edge of the table while trying to clear a birdnest, I couldn’t pull the wire out until I straightened the cable
- Preheated aluminum material for 30-60 seconds with a small propane torch. Garage temperature was in the 40s and preheating made a difference in the success rate, and quality of weld starts
- Laid the gun on its side to start an arc, then rotated into welding position. This welder does not have a run-in timer to slow wire speed at the start of the weld. With wire flying out of the gun at ten inches per second, starting at a shallow angle gave time for the arc to establish without jabbing wire into the workpiece.

Results
A solid showing out of the box by the Hobart 140 welding on ⅛-in aluminum. After some practice using the manufacturer’s recommended settings, I made consistent welds that began a little cold but settled to a stable arc with good penetration.
I should have stopped here—but I was feeling good about how this was going and I had some 1/16-in aluminum on hand. So I lowered the voltage setting to position 3 and left the wire speed control at 90 to match the chart inside the welder.
Well, between all the burn-back and burn-through, it was a real mess. I couldn’t make good welds on the thin stuff with any consistency. I’ll have to revisit this another day—maybe with a Teflon liner.
See how this works
Here’s a short video showing a gentleman who appears to have overcome the aluminum wire feed issues. In an earlier video, he talks about changing the liner to nylon, using an oversized contact tip, very light tension, and a very small bottle of 100% Argon gas.
He managed to lay down a smoother weld than most, using what looks like a basic 90-100 amp welder. The bead looks cold, so penetration could be an issue. But a good effort. His tip about pulling the nozzle out 1/4″ to maintain gas coverage with a long stick-out is a good one that I added above.
Just a start
I hope these tips lead to success if you decide to take a shot at MIG welding aluminum without a spool gun.
Welding with aluminum is a lot different than working with steel, and we’ve only touched on actual aluminum welding techniques.
For more info, a good start is Lincoln Electric’s guide: ALUMINUM GMAW Gas Metal Arc Welding for Aluminum.